Saturday, 29 October 2011
Ice-Cream Cone Cupcakes
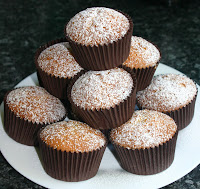
My daughter wanted to learn how to make cupcakes and muffins. I like new ideas for baking, but although this idea is not new, it is very effective, so she had a choice between making traditional cupcakes or having a go at making ice-cream cone ones. They really are very simple.
Ingredients
Your normal cupcake or muffin recipe mixture
Flat bottomed ice-cream cones
Buttercream in your favourite colour and flavour
Extra decorations
There really is no point putting quantities. bought a standard box of ice-cream cones. Make sure they are flat bottomed otherwise you won't be able to stand them up. Any leftover mix can be made into standard cakes and if there is buttercream left it can either ice the other cakes or stay in the fridge for a few days.
Spoon the muffin mix straight into the cones until about 3/4 full, place each one in a muffin pan to stop them toppling over, then bake them on the middle shelf for 20 minutes at Gas 6.
When they come out, the mix should have risen just above the cone. Lift them onto a cooling rack, leave until completely cool then either pipe or spread on the icing and decorate.
They are best eaten within 24 hours as the cones go soft. Miraculously the cones don't burn in the oven, so there is no need to foil them or cover them at all. I think my daughter made a fantastic job of these and considering this was also her first time piping buttercream, she can be really proud of how they turned out.
Sunday, 18 September 2011
Spicy Sweet Potato Soup
Served with Barbari bread |
2 onions
1oz / 25g butter
5 sweet potatoes
½ chopped red chilli (seeds removed)
2 tbsp lemon juice (or juice and rind of 1 fresh lemon)
3 tsp freshly ground cumin seeds (or 2 tsp ground cumin)
1 pint vegetable or chicken stock
salt and freshly ground black pepper
Peel and chop the onions.
Peel and chop the sweet potatoes into even sized chunks
Melt the butter and cook the onions until soft.
Add the chilli, cumin and lemon juice and cook for a further minute to release the flavours.
Add the stock, and then add the sweet potatoes and seasoning.
Cook for 40 minutes or until the sweet potatoes are soft.
Purée the soup, return to pan and reheat.
Curried Parsnip and Potato Soup
Served with Barbari bread |
1lb parsnips
1 large potato
1 large onion
1oz / 25g butter
1 level teaspoon hot curry powder
2 pints (1.1 litres) chicken stock or vegetable stock if you prefer to keep it vegetarian
salt and freshly ground black pepper
Peel and chop the onion.
Peel and cut the parsnips and potatoes into even sized chunks.
Melt butter in a large pan and gently fry for five minutes until soft but not brown. Add the curry powder and cook for a further minute. Keep stirring or the spice will catch on the heat.
Stir in the stock and season with salt and pepper.
Add the parsnips and potatoes and bring to the boil, then lower the heat and simmer gently, covered for 40 minutes or until vegetables are soft.
Purée the soup and then return to the pan to reheat
This soup can be frozen.
Tuesday, 24 May 2011
Spicy Butternut Squash Cake
I had never heard of a butternut squash until I had my first child. When I was weaning him onto solids I used a recipe book by a children's cook, Annabel Karmel, that stated babies LOVED the taste of this weird and wonderful member of the squash family. She was right, he loved it. Some days I mixed it with apple, some days with pear and other days with savoury ingredients and not once did he refuse it. In fact, all my children loved this sweetly smooth vegetable. Soups made with it are superb and it absorb flavours well, from curry spices through to pudding spices. Sage is also an excellent flavour to marry with butternut.
I've been thinking about using puréed vegetables in cake mixes for a while now, after my son said he'd eaten courgette cake at a friend's house and how nice it was. I had a butternut in my fridge and scoured recipes and came across this one. It is stated as a bread, but it's a cake really - cooked in a lined and greased 9x5" loaf tin.
It is beautifully moist but definitely more likely to appeal to the adult palette. My older two liked it, but didn't rate it as highly as other cakes. The younger two did not like it at all. It needs to be left for at least a day before it is eaten as the spices are still very pungent and haven't had time to develop. It is also nice spread with butter.
In this recipe, it is very important to roast the squash beforehand and to purée it. It will give you an idea of the yield you have to determine how many cakes you can make. One cup of purée will give you one cake, so if your squash makes two cups, double the recipe, three cups, triple it and so on. To roast, split the butternut in half lengthways, scoop out the seeds and put the two halves cut side down on a baking sheet and roast at Gas 4 / 350F / 180C for 45 minutes or until a knife goes through the flesh with no resistance. Scoop out the flesh and put through a blender and discard the papery skin. If you don't fancy making multiple loaves, then what's left can be made into a soup.
If you're not likely to eat this cake within 3-4 days, it is best sliced and either stacked with greaseproof paper between the slices, wrapped in clingfilm and placed in an airtight box to be frozen.
Ingredients
1½ cups plain flour
1 tsp bicarbonate of soda
½ tsp salt
¼ tsp ground cloves
½ tsp ground nutmeg
¼ tsp ground ginger
1 cup butternut squash purée
1 cup granulated sugar
½ cup vegetable oil
2 large eggs, beaten
¼ cup water
Method
1. In one bowl, sift flour, soda and all the spices.
2. In another bowl mix the butternut purée, sugar, oil, eggs and water until well blended. This will appear very sloppy and the oil will take a while to mix, but don't worry if it doesn't mix completely.
3. Add the dry ingredients and stir until well mixed.
4. Pour into loaf tin and bake at Gas 4 / 350F /180C for 50-60 minutes or until a skewer inserted in the centre comes out clean.
5. Leave to cool in tin on a wire rack for ten minutes, then remove from tin and cool completely.
I've been thinking about using puréed vegetables in cake mixes for a while now, after my son said he'd eaten courgette cake at a friend's house and how nice it was. I had a butternut in my fridge and scoured recipes and came across this one. It is stated as a bread, but it's a cake really - cooked in a lined and greased 9x5" loaf tin.
It is beautifully moist but definitely more likely to appeal to the adult palette. My older two liked it, but didn't rate it as highly as other cakes. The younger two did not like it at all. It needs to be left for at least a day before it is eaten as the spices are still very pungent and haven't had time to develop. It is also nice spread with butter.
If you're not likely to eat this cake within 3-4 days, it is best sliced and either stacked with greaseproof paper between the slices, wrapped in clingfilm and placed in an airtight box to be frozen.
Ingredients
1½ cups plain flour
1 tsp bicarbonate of soda
½ tsp salt
¼ tsp ground cloves
½ tsp ground nutmeg
¼ tsp ground ginger
1 cup butternut squash purée
1 cup granulated sugar
½ cup vegetable oil
2 large eggs, beaten
¼ cup water
Method
1. In one bowl, sift flour, soda and all the spices.
2. In another bowl mix the butternut purée, sugar, oil, eggs and water until well blended. This will appear very sloppy and the oil will take a while to mix, but don't worry if it doesn't mix completely.
3. Add the dry ingredients and stir until well mixed.
4. Pour into loaf tin and bake at Gas 4 / 350F /180C for 50-60 minutes or until a skewer inserted in the centre comes out clean.
5. Leave to cool in tin on a wire rack for ten minutes, then remove from tin and cool completely.
Sunday, 22 May 2011
Maple Syrup Muffins
I've always got a bottle of maple syrup in the larder and usually it's only poured over pancakes as I've often been wary of baking cakes with it as it has such a strong flavour. But today my mouth has been watering at the thought of eating something cakey with it, so instead of heading for the chocolate muffin recipes I have, I decided to do a basic mix and then add in a bit of maple syrup. I was still a bit hesitant about quantities, so I used half golden and half maple and I think the balance is just right.
4oz butter, softened
4oz caster sugar
4 tbsp maple syrup, plus extra for drizzling
4 tbsp golden syrup
2 eggs
8oz self raising flour
4 tbsp milk
cinnamon and icing sugar to dust
Cream butter and sugar until light and fluffy. Add all other ingredients and mix well. Put into muffin cases and bake at Gas 5 / 190C / 375F for 25 minutes.
When the muffins are just out of the oven put two skewer holes in, drizzle over extra maple syrup, sprinkle with a tiny dusting of cinnamon and then a layer of dusted icing sugar.
These are so delicious warm. My youngest son had just gone to bed by the time they were cool enough to eat, but he heard the Mmmmmms coming from downstairs and was allowed to come down to enjoy the first batch with us. Next time I bake them I'm tempted to top them with a maple flavoured icing .
Sunday, 15 May 2011
Beer and Mustard Bread
My son has wanted to be a chef since he was four years old. Whether he continues with that career choice remains to be seen, but he does like to be given opportunities to get in the kitchen as often as possible. He doesn't err towards baking sweet things like I do, but savoury and side dishes. Today he wanted to make bread. An ordinary white loaf didn't appeal. He wanted to make a cheese and onion loaf, but our meagre amount of cheese in the fridge soon put an end to that.
Undeterred, he found a recipe for beer and mustard bread and after getting permission from his father to raid his stock of Boddingtons, he set about making his own loaf.
His first loaf was quite intricately designed, he says, to be a 'sharing' loaf. He served it on a wooden bread board with butter on the side with our main meal today and every single bit of it has gone.
Undeterred, he found a recipe for beer and mustard bread and after getting permission from his father to raid his stock of Boddingtons, he set about making his own loaf.
Custard Dreams
The biscuit tin in my house empties way too quickly and I do get to a point where I refuse to buy more. Partly because I'm all too often the guilty party dipping into it and whilst they're there for the eating.....!
My daughter made these biscuits for a homework assignment a couple of years ago and they were a great success, so I decided to make them again today.
Biscuits
250g/8oz butter
1 cup caster sugar
1 egg
1 tsp vanilla extract
2¼ cups plain flour
½ custard powder
1½ tsp baking powder
Icing
1 cup icing sugar
2 tbsp soft butter
½ tsp vanilla extract
2 tbsp condensed milk
1. Cream butter and sugar together until light and fluffy.
2. Gradually add all other ingredients, chill for ten minutes.
3. Break off pieces and roll into balls the size of a walnut and place on an ungreased baking sheet. You can make them as big or little as you like.
4. Press down balls with a fork to flatten slightly and then bake at 180C / 350F / Gas 4 for 15 minutes (shorter or longer depending on how big you make the balls).
5. Cool on a wire rack. When totally cool, mix all icing ingredients together, chill mix for ten minutes, then use to sandwich biscuits together.
6. Find a willing volunteer to try out the first one!
Thursday, 5 May 2011
When the butter's rock hard
Some days I want to make a cake in a hurry, but the butter dish is running low and the new pack is in the fridge, rock solid. At times like this I use the following recipe because it doesn't use butter. It's great because you put everything into one bowl and mix it up quickly. It gives a really delicious and moist cake.
200g plain flour
2 tbsp cocoa powder
1 tsp bicarb of soda
1 tsp baking powder
125g caster sugar
2 tbsp golden syrup
2 eggs
150ml vegetable oil
150ml milk
Put all ingredients in a bowl, mix well and then put into either an 8 inch cake tin or two 8 inch sandwich tins and bake at Gas 4/ 160C / 325F for 30 - 40 minutes.
I like to serve this still slightly warm, sandwiched and topped with chocolate royal icing and a big dollop of vanilla ice-cream.
Wednesday, 27 April 2011
Involving Children
I've not met a child yet that doesn't like baking and I've not met a child who is not prepared to taste their own creations. It can be a fabulous way to introduce new tastes and textures to fussy eaters. It allows them to be creative and best of all - to get messy.
Having two of my four children born with severe food intolerances brought home to me the importance of knowing where food comes from, what's in it and how it's made. At times I've bought things for the children and then searched for recipes to make my own version - more often than not the children enjoy the homemade version more. Other times the factory wins over me, but its fun messing around with the ingredients.
Children should not find baking intimidating. If you're not confident yourself, your children will pick up on that, so don't feel pressured to start teaching them anything too complicated to start with. With my children, I started with muffin mixes. They're not as precise as sponge mixes so they inevitably come out more successful than fairy cakes. Also, biscuit mixes and cookies. A plain biscuit mix can lead to all variations of creations, and all it takes to change the flavour is a little flavouring extract, or to change colour, some food colouring.
I usually double up quantities when my children want to bake. That way I can split doughs and cake mixes between them. It saves arguments over who gets most, stops them constantly elbowing or knocking each other when trying to work and also gives them the chance to make a whole batch of goodies. They love having their own working space, but if your kitchen doesn't allow for this, try to put them side by side with their own doughs or mixes. One may like to add a flavouring to theirs, another might prefer a colour or keeping it plain. You can really see a child's individuality come out when they're left to their own devices.
My younger two love making biscuits. This week they wanted to make their own jammie dodgers. They made a basic biscuit dough, rolled it out and then used different shaped cutters. With just a little supervision when rolling out pastry, as kids tend to roll it until it's like a sheet of paper, they got some really good results. They tasted great too. In fact they hadn't even cooled properly before they were all eaten.
Any flavour jam can be used to fill them. My children chose my homemade blackcurrant jam for these ones, but we've had just as good results from a jar of shop bought jam.
Thursday, 21 April 2011
Leftovers
'Best before' dates? I tend to ignore them most of the time. 'Use by' dates command my respect a bit more and I am more cautious, but if the food is not something likely to spoil within a day or two of the printed date, I still use it.
So much food is wasted as people don't have the basic skills or confidence to know what to do with leftovers. Having to buy more than you need for a recipe will result in something festering away in the fridge, or perhaps too many roast potatoes or meat from a joint is left over, or you've had to separate an egg and have no idea what to do with the yolks or the whites that are left.
Don't be afraid to put leftovers in your fridge for use another time. Food is expensive and it's accounting for a major part of our disposable income every week - and you don't get a lot for your money. I grew up with a mother who threw away obscene amounts because she didn't like the thought of 'second hand food'. She's come round over the years to my way of thinking and occasionally I do spot the odd cold sausage in her fridge or a few roast potatoes. I remember one Christmas she had so much veg, roast and boiled potatoes and turkey left over, I recoiled in horror when she headed towards the bin with it and managed to convince her to put it in plastic boxes for me. I made four family meals out of it. One year she had a solitary rasher of streaky bacon left after covering the turkey, so went to throw it away. Why it couldn't have just been put on the turkey is anyone's guess, but she wouldn't fry it for breakfast the next morning as it was the 'wrong type of bacon'.
I have a shelf in my fridge that I put all the leftovers on, so I know they have to be used quickly and they don't get forgotten. If your budget is really tight for food, it can be a real joy to know you can make a meal out of practically nothing. You don't need to invest in cook books either. Quite often I go here, type in the ingredients I have and scour through the ideas. Some recipes I follow but others prompt me to try something different and I've had good results.
Today I had half a small jug of single cream left over in my fridge and 2 egg whites. I made some meringues, using the 2 egg whites, 60g of brown cane sugar and 60g of icing sugar. I got a dozen tablespoon sized individual meringues out of the mix. In a small saucepan I melted some butter, squirted in two blobs of golden syrup, added 2 tbsp of cocoa powder to make a rich paste and then added the cream and stirred it through. he meringues were sandwiched together with a scoop of vanilla ice-cream, then the chocolate sauce was drizzled over.
So, a delicious pudding that served four children, which, if I'd thrown away my unused egg whites and single cream, they'd never have got to enjoy.
Meatballs and Spaghetti
As I grew up there seemed to be a pattern where a certain culinary craze would hit a height and people would aspire to be like the chefs on television. Maybe a certain ingredient was in vogue (like rhubarb is at the moment), or a plate shape or a presentation style. It seems now though, that anything goes and you can flit between fine presentation and rustic, depending on the season, your guests, your mood, your time allowance and your budget. I'm no artist, but I do like messing around with ideas to present meals and treats. I really enjoy "sharing meals", where everything is placed on the table and everyone helps themselves.
One of my favourite rustic and easy sharing meals is spaghetti and meatballs. My meatballs are quite basic, minced beef, egg, onions, garlic, herbs, ginger and seasoning. I roll them into balls and place them on a patty tin greased with spray oil, then bake them in the oven for 15 minutes. While they're baking I make a sweet herby tomato sauce in a deep frying pan, then transfer the meatballs in and finish cooking them through. I've found baking them first helps to keep their shape as putting raw meatballs into a pan and then trying to turn them just ends up with them in a big collapsed jumble. Today I added a few slices of frozen mozzarella cheese to the sauce and let it melt in and it added a lovely creamy taste and texture to the sauce. The meatballs and sauce simmer away happily while a big pot of spaghetti bubbles away.
The spaghetti is piled into a huge bowl, meatballs on top and half the sauce drizzled over. The rest of the sauce in a jug so everyone can help themselves to more. We love sitting at the table around the big bowl and digging in. Usually we end up with bits of spaghetti on the tablecloth or the odd meatball escaping off the serving spoon as it rolls off en-route to the plate, but it's all part of the fun!
Wednesday, 20 April 2011
Creamy Shortcake Sandwiches
I love the days when my children have friends over. It gives me an excuse to bake and my children always love it when I'm experimenting with new recipes. Quite often this is around early evening, so staying up a little late in order to wait for things to cool down for the taste test is a real treat.
I had some double cream left over in the fridge from a meal a few days back and not liking waste, it had to be used. The result is a beautiful creamy, but slightly crumbly biscuit base, layered together with a rich sweet icing filling.
Some tips before you start:
Be careful when you cool them. Loosen them on the sheet with a palette knife, but don't attempt to put them on a cooling rack - they'll crumble. Wait until they're quite cool and be careful handling them. Of course, if you have a couple of casualties like I did, there is usually somebody not too far away hoping this will happen so they can help get rid of the evidence!
I used double the ingredients listed here for the icing as I like them to be really full for the children. What child doesn't love it when they bite into something and the filling oozes out the side? If I was making these for adults, I'd keep the icing amounts stated in the recipe.
Creamy Shortcake Sandwiches
Biscuit
1 cup butter (softened)
1/3 cup double cream
2 cups plain flour
1/3 cup granulated sugar
Icing
1/4 cup butter, (softened)
3/4 cup sifted icing sugar
1 egg yolk
1 tsp vanilla extract
1. Biscuits: Mix flour and butter together thoroughly (do not add sugar at this point). Stir in the cream, mix well and chill in fridge for 1 hour. The mix will seem like a stiff cake mix at this point. Don't worry. It will solidify slightly when it's chilled.
2. Preheat oven to 375F / 190C / Gas 5.
3. Flour the surface really well, and your hands. The dough is extremely sticky, but will form a lovely soft ball when you bring it together. Roll it out to about 3mm thick, then cut into 1½" rounds. (Or you could use hearts, stars etc).
4. Put sugar on a piece of paper, then coat both sides of the biscuit in the sugar. I used a palette knife to lift and flip them as they're incredibly pliable. They won't stay perfectly round, so don't worry.
5. Lay them on an ungreased baking sheet (no need to grease it as the ratio of butter in the mix will be enough to form a non-stick layer). Prick with a fork and then bake for 7-9 minutes (shorten or lengthen the time if you have used a different sized cutter). Leave to cool.
6. Filling: Blend all ingredients together and sandwich two biscuits together.
Wednesday, 30 March 2011
Ginger Zingers
There are some dishes that just shouldn't be messed around with - crême brulée being one of them. I don't like adding fruit in the base, spiced up custard and serving zesty sauces with them. It's a classic dish and one that should be left as naked as it started. I used to be the same about shortbread biscuits, but I came across an idea to spice up the basic mix. I wasn't convinced at first and I mulled it over for a while and then decided to give it a try. After all, what is the point of experimenting if you're not going to experiment?
In this recipe I've used ground ginger and have topped it with a ginger based icing. It's got a strong kick to it, so if ginger is not your thing, try experimenting with other spices. These are especially nice with tea or coffee, so perfect for that rare moment you may get to put your feet up for five or ten minutes.
I was very surprised too, that all my children liked them. My two sons and eldest daughter are not fazed by the thought of new food and they eagerly try anything new put in front of them. My youngest daughter is a different story. It's hard to even get her to try new foods and what she does like is very limited and somewhat bland, so with this particular recipe I was certain the strength and heat of the spice would offend her palate. But she proved me wrong and loved it and even asked for more. So, again, another hit in the household and requests for more to be made very soon.
Ginger Zingers
The shortcake base:
225g (8oz) plain flour
100g (3½oz) caster sugar (I use unrefined golden)
1 tsp baking powder
2 tsp ground ginger
150g (5½oz) butter, cut into cubes
The icing:
150g (5½oz) butter
60ml (2fl oz) golden syrup
300g (10½oz) icing sugar, sifted
2 tbsp ground ginger
1. Heat oven to Gas 4 / 180C / 350F. Line a 7x11 inch baking tin with baking parchment.
2. Make base: Put flour, sugar, baking powder and ginger in food processor. Pulse to mix, then add butter and process for a few seconds to create a breadcrumb mixture.
3. Bring together by hand into a ball and then press mixture into tin and level off.
4. Bake for 20-25 minutes until golden. Remove and leave in the tin until completely cold.
5. Make icing: Put butter and syrup in pan and melt slowly. Add sifted icing sugar and ground ginger and mix well to a smooth consistency. Keep on heat, stirring, for 2 minutes. Remove and pour immediately over cooled base. Leave to set.
6. When set, remove from tin and cut into squares or triangles.
Friday, 25 March 2011
Rolo Bombs
According to my kids these are the best cookies I've ever made. I've experimented with a lot of recipes, but these really hit the chocolate spot. The recipe is simple to follow and a great one to do with the kids as they can play around with the dough and have fun hiding the sweets inside.
My children were up past bedtime last night making these as they were so much fun - and of course, they had to stay up just a little bit longer for the taste test.
The Rolo in the middle melts and creates a pocket of caramel, which oozes out of the centre of the cookie. When they cool, the filling is chewy like toffee, but the lovely thing about these is you can put them in the microwave for a few seconds to warm up and melt again, without ruining the taste or texture.
In fact, the dough was so nice my eldest daughter took an uncooked ball with a Rolo inside in her lunch box today in place of her usual chocolate bar!
Rolo Bombs
1 cup butter, softened
1 cup caster sugar
1 cup brown sugar (any brown sugar will do)
2 eggs
3/4 cup cocoa powder
1 tsp bicarbonate of soda (if you don't have this, omit and use self-raising flour instead of the plain)
Seeds from 1 vanilla pod (or 2 tsp vanilla extract - don't use essence - the quality of flavour is not there)
2½ cups plain flour
2 tubes Rolos
Cream the butter with the sugars, then mix everything else in, except the Rolos. That bit comes later. Once you've made the mix, it will look like crumbs and will be quite bitty and grainy, but once it comes together in your hands, the warmth releases the oils and it binds really well.
When they're cooked, leave them on the baking sheet for at least five minutes as the centres are very gooey and will drop out the bottom otherwise.
Mix dough into a golf ball |
Flatten, then place Rolo in centre |
Roll back into a ball |
Roll in extra sugar |
Bake at Gas Mark 4 for 10 minutes |
When cooled - EAT and ENJOY!!!! |
Monday, 21 March 2011
Equipment : Weighing
The correct equipment is essential when baking some dishes and for others, it's not really important at all. Throughout this blog I'll be sharing ideas about utensils I use which I couldn't do without and also the tools I use which aren't so conventional.
Scales: There are recipe quantities which you just 'know' are right. If you're experienced at making batter, you get to know the consistency and colour, whether to add another egg, whisk a little more or add more flour. If you like runny custard you add more milk than the recipe states, if you like it thick you add less. Measurements are not important. But if you're making choux pastry, the weight of ingredients is essential and it's worth the extra time and fiddling around to make sure the recipe is followed to the gram or oz. When making jams, the correct amount of sugar is imperative to ensure it sets. The scales I use are digital and can be reset when loaded. If a recipe calls for eggs, sugar, flour and butter to be mixed at once, I can add each ingredient to the bowl and reset the scale to zero to weigh the next ingredient. They are also interchangeable so I can measure either metrically or by imperial weight. However, if you do have a recipe that states both, make sure you stick to one method of weighing and never mix imperial and metric.
Reflecting on this, I remember my Mum having old fashioned brass balance scales. I used to love helping her weigh ingredients, watching the pans go up and down as weights were lifted and replaced on each side and waiting for the final wobble to cease when the scales balanced. Then tipping the ingredients into a bowl and then starting again with the next ingredient. Sometimes we'd end up with four or five bowls all neatly lined up and accurately weighed. It took ages but as a kid I didn't have to rush off to deal with other responsibilities, so it was fun. Whilst I was dabbling around, she used to potter with other chores. She got rid of those scales a few years back and I am rather sad really, as given the chance I know I'd use them again on an afternoon when I had a little time to potter with them.
Cups: American recipes are becoming extremely popular in the UK and the measuring system is most often in cup measurements. It's worth investing in a set. You can get online conversion charts that give equivalent weights, but why bother referring back and forth to a chart if you can just scoop your ingredients up? It also makes measuring ingredients incredibly speedy, so if you need to make something in a hurry, cups are great. Stainless steel is best.
Measuring spoons: Take a look in your cutlery drawer and pull out five teaspoons. If your drawer is anything like mine, you'll pull out five completely different shaped and sized ones. Which one is a REAL teaspoon in terms of baking weight? A level one of them may only fill half another one, so when you're measuring baking powder, how do you know you've got enough or too much? If you need a flavour extract, a larger teaspoon may end up overpowering your entire dish and ruining it. A smaller one can leave the finished dish lacking in taste. Measure too much salt into a dough mix and you risk inhibiting the yeast. Like cups, measuring spoons are accurately calibrated and it's worth having a set in your basic equipment. Again, if you can, get stainless steel.
With both cups and spoons, remember not to pack the ingredients tight. Just tap the excess off and if necessary level off with the back of a knife.
Sunday, 20 March 2011
20 Minute Treats
Days like today, when I'm feeling run down and generally not well, I still have to consider fillers for the school lunch boxes. So, anything that can be mixed, baked, cooled and finished off in 20 minutes is a winner.
I baked two Swiss rolls, one plain and one chocolate, which took 15 minutes. Whilst they were baking I made chocolate buttercream. The cooled sponges were then cut into rounds. A plain and chocolate round were sandwiched together with the buttercream. The finished treats were piled on a plate and dusted with icing sugar.
Simple and tasty.
Saturday, 19 March 2011
Passion Cake
I spent a day with my Mum yesterday and whilst we were queueing at a café, I spotted a very delicious looking cake. It was called Passion Cake. I'd never heard of it before, so upon further research, found out it was actually a variation of carrot cake.
I was pleasantly surprised when today, after offering to bake a carrot cake for the women's tea and cake afternoon at church I came across the recipe in one of my cook books. Feeling a bit bold I thought I'd experiment and give it a go and if it was a success I'd take it along. If not, I'd have to admit defeat and take along a shop bought one. It also has banana and walnut and I can say, from tasting the leftover mix in the bowl, the banana is detectable, but not overpowering. How it tasted in the baked sponge I can't tell as it had all gone by the time I went to get a slice!
Wednesday, 16 March 2011
Toad In The Hole
A traditional English dish of sausages served in Yorkshire pudding batter.
If you can make batter, you can make Yorkshire pudding. If you can make Yorkshire pudding, you can make Toad In The Hole. It's a very easy dish to make and has been a favourite of mine since I was a child. My Mum used to be able to get the batter risen around the edges to almost twice the height of the dish and it took me years to realise that using a glass dish makes the batter rise better than if you make it in a metal dish.
It's now become a favourite with my children and I have to use a full sized roasting dish as my recipe takes 12 sausages (2 each). Always served with mashed potatoes (put through a ricer to make them lumpless), thick gravy and vegetables.
My Kitchen
I love kitchens. To me they truly are the heart of the home. Most of my spare time is spent in mine - either cooking, eating, having coffee with friends and neighbours, or just pottering around.
When my husband and I first discussed extending our house, the main thing we agreed on was that the kitchen had to be at least doubled in size. I look at the design now and know it could be better and I look to the day I can start again and redesign it. I want a kitchen I can sit people down in for meals, where people can hang around and chat over a coffee, or where I can run a small production line of home made baking ready for when the kids come home from school, or when a group of friends are coming over for a girlie night.
In fact, the production line is already happening. There's no other way to make packed lunch for four children. But, I'm grateful for the kitchen I do have and I love my double oven which is just on its last legs, but still manages to churn out the odd delight now and again.
So, this blog is nothing mind-blowing - just what I love doing in my spare time. Cooking.
When my husband and I first discussed extending our house, the main thing we agreed on was that the kitchen had to be at least doubled in size. I look at the design now and know it could be better and I look to the day I can start again and redesign it. I want a kitchen I can sit people down in for meals, where people can hang around and chat over a coffee, or where I can run a small production line of home made baking ready for when the kids come home from school, or when a group of friends are coming over for a girlie night.
So, this blog is nothing mind-blowing - just what I love doing in my spare time. Cooking.
Subscribe to:
Posts (Atom)